+30 2810 237502 ▾



CNC Touch Plate 70×70 mm Edge and Zero Finder 63,00 € (inc VAT)
3-Flute Aluminium End Mills for CNC Router Milling Price range: 15,50 € through 32,00 € (inc VAT)
TORGOS screenset for Mach3
99,00 € (inc VAT)
A Mach3 screenset built for the shop floor: large digits, one-button tool measurement and zeroing, a tool rack, quick G-code without CAM. Installs into a copy of your profile — yours stays untouched. English and Greek.
Περιγραφή
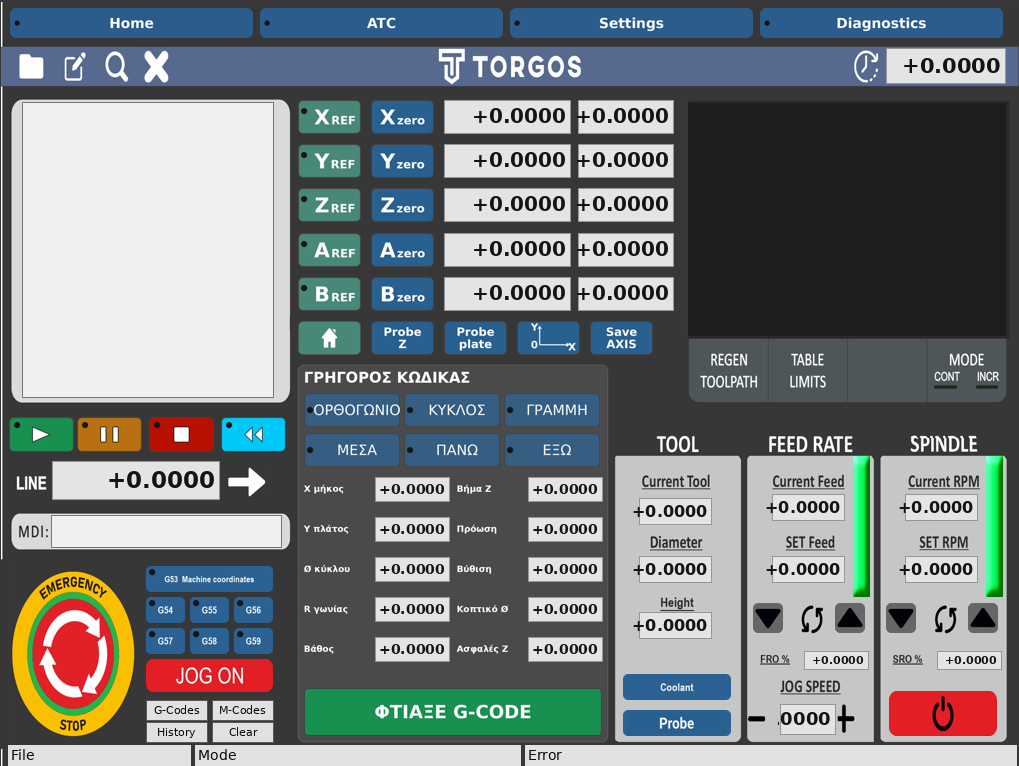
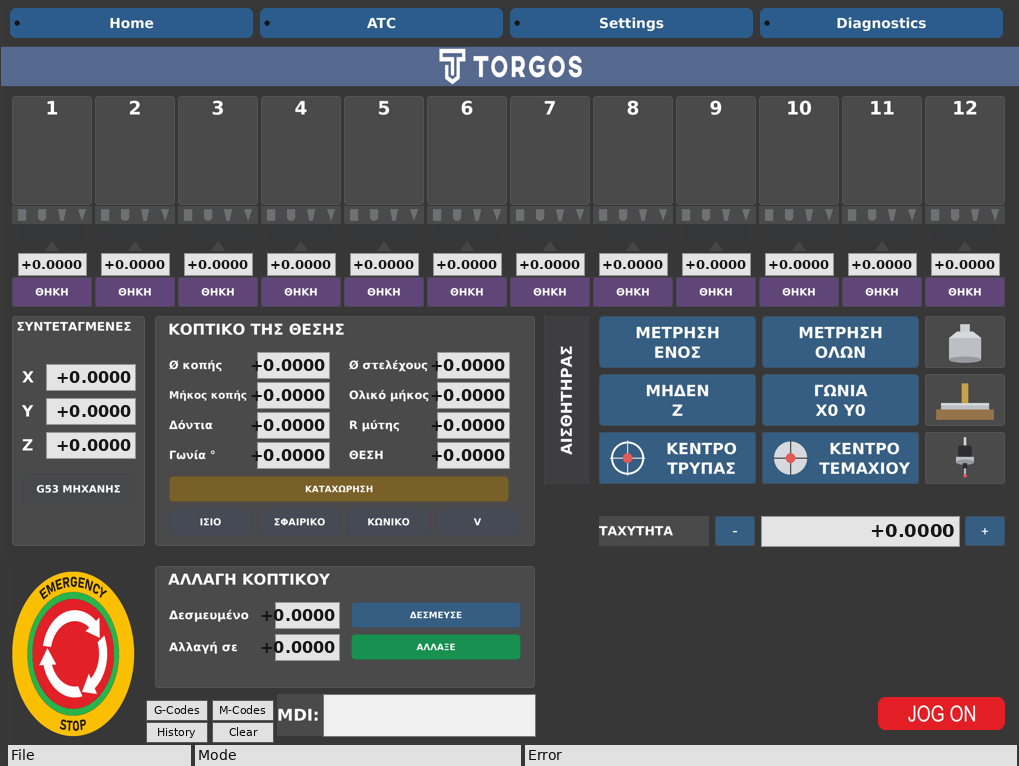
TORGOS screenset is a new operator screen for Mach3, designed by a CNC engineer for everyday work at the machine tool. The default Mach3 screen has small buttons and hides the everyday functions inside menus. TORGOS screenset is designed to be read clearly, and everything the operator needs every day is on the first page. That is where tool measurement, zeroing and referencing happen, and there is a quick G-code environment that needs no CAM for simple jobs. For machines with an automatic tool changer there is a separate tab with the tool rack and the measurement of every tool with one press. It is the only Mach3 screenset available in Greek, and it comes in an English edition as well.
Price and what is included
The price is €99 including VAT. The licence covers one business, for all of its machines, with no subscription, and includes:
- The installer, which installs the screen into a copy of your profile without touching the original.
- The screen in Greek and English.
- All the measurement and zeroing macros.
- The manual as a PDF, in both languages. You can read it before you buy (English · Greek), because it describes in detail what every button does.
- Every future version, at no extra charge.
- E-mail support for 30 days, for the installation and for filling in the settings.
If you would rather not deal with the settings, we offer remote setup for €70. We connect to the machine’s computer, fill in the values of your own machine tool and test the measurements together until they work correctly. It is one session, usually about an hour.
On TORGOS machines the screenset comes installed and configured, worth €169 together with the setup, so that the machine is delivered ready for work.
Which machines it suits
The screenset is a screen for a Mach3 that already works correctly. It does not set up a machine tool from scratch and does not correct its settings, such as steps per millimetre, ports and pins, limits, backlash or the tool-change procedure. Those stay as you have them. If your machine does not move correctly today, the machine has to be set up first and the screen installed afterwards.
The measurements with the height sensor, the touch plate, the corner plate and the 3D probe work on any machine that has a probe input. The automatic tool change functions, that is the tool rack, MEASURE ALL and the automatic tool change, are designed for TORGOS machines and for machines we have rebuilt. Every tool changer is different, with its own cylinders, clamp, bridge and outputs, so on a machine from another maker these buttons may not work without adaptation, and adaptation may mean a retrofit. If you are not sure, ask us before you buy.
The 30-day support covers the installation, filling in the TorgosProbe.txt settings file and the operation of the screen buttons. It does not cover machine setup, wiring and sensors, Mach3 settings outside the screenset, or changes you made inside the macros yourself. For those there is the remote setup.
The main screen
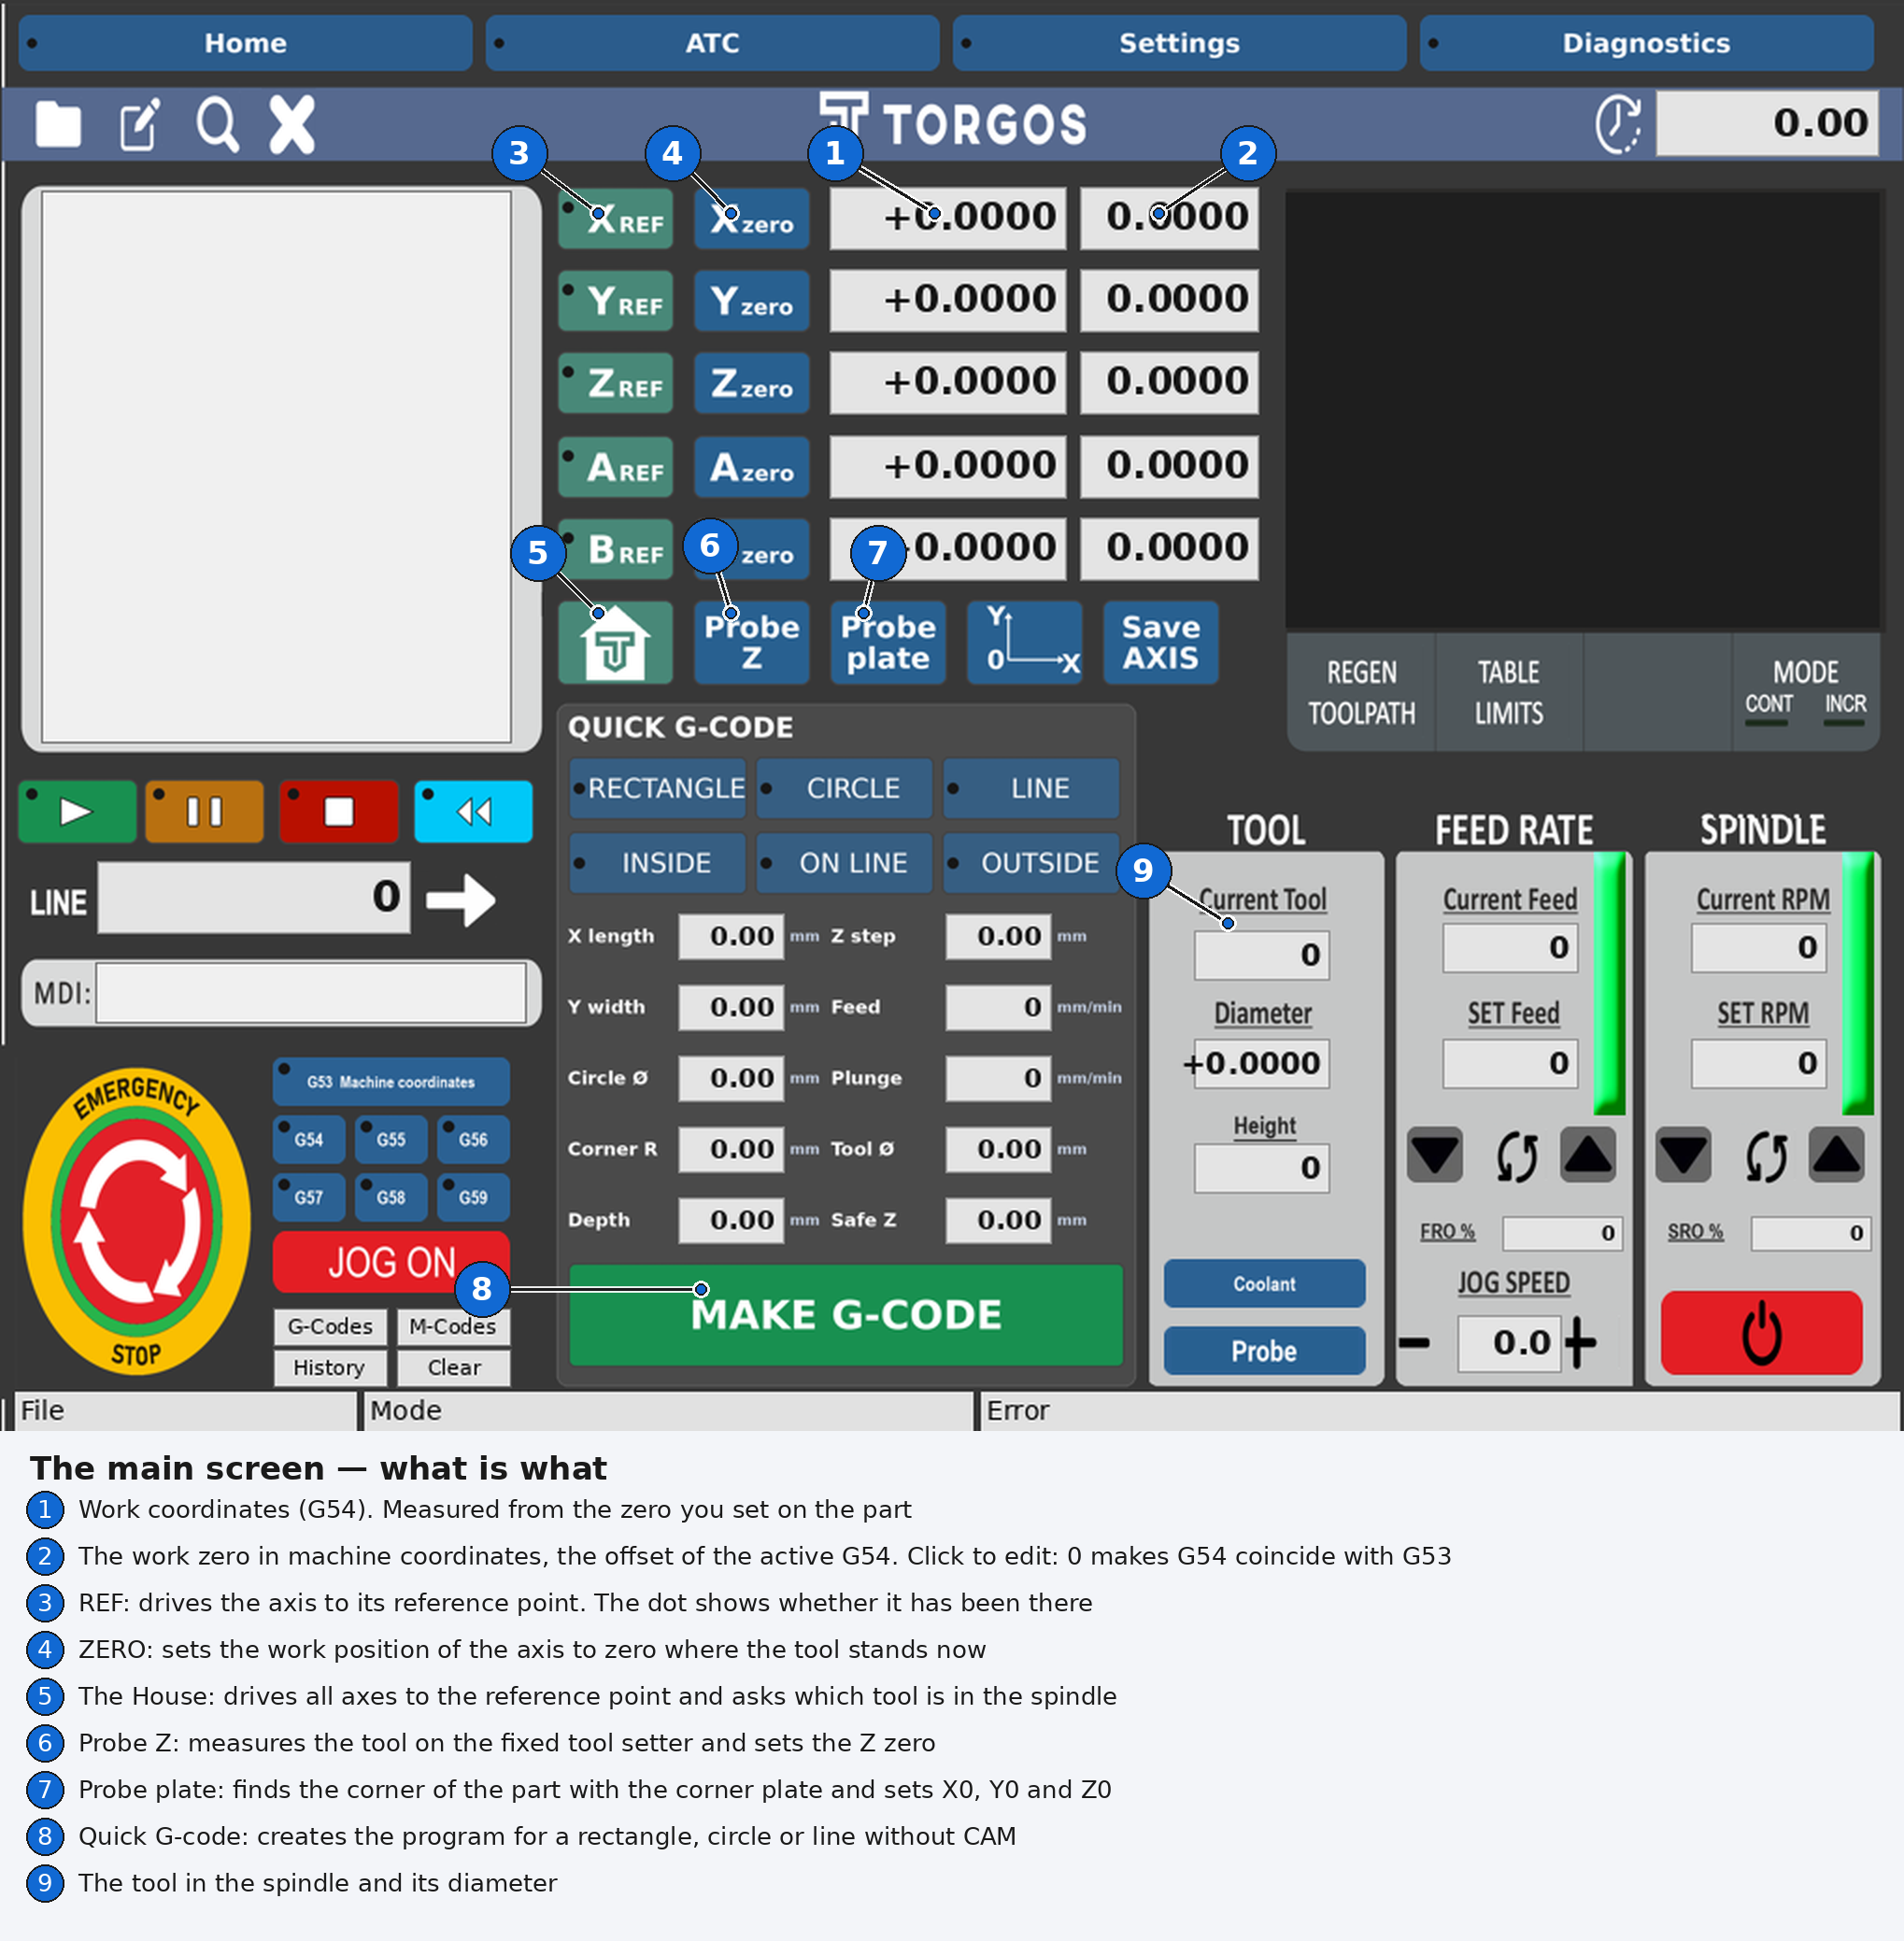
In the centre are the DROs, the position readouts of the axes. Every axis has two readouts. The left one shows the position of the tool in the work system, relative to the zero you set on the workpiece, and it moves with the tool. The right one shows where that zero lies in machine coordinates, that is the offset of the active work system G54 to G59, as on the Offsets tab of Mach3. It does not change when you move the machine, only when you zero. It can be clicked and accepts a number: with 0 the work system coincides with G53. Next to every axis are the buttons REF, which drives the axis to its reference point, and ZERO, which zeroes the work position where the tool is now. The indicator next to REF shows whether the axis has passed through its reference point.
Reference point of all axes, the House

It drives all axes to their reference point in the predefined order. Before it moves anything, it asks which tool is in the spindle. We answer 0 when the spindle is empty and all tools are in the rack, otherwise the tool number. On machines with automatic tool change it accepts only pockets that have been declared with the HOLDER button on the ATC tab. In the manual installation it accepts any number from 1 to 12.
The question exists to protect against a hasty move by the operator. Mach3 remembers the tool number from the last time it closed. If it closed with tool 3 assigned and in the meantime you changed the tool by hand, when it opens again it still believes it holds tool 3. Because every tool change starts with the rule “if the same tool is requested, do nothing”, the program would cut with the wrong tool without any warning. The question at referencing prevents that.
Quick code
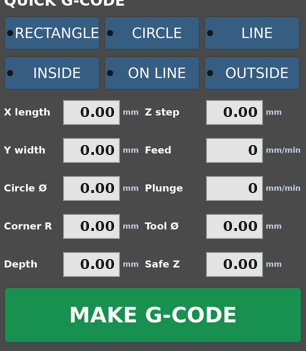
Right below the DROs is the Quick code. It generates the program for three basic shapes, rectangle, circle and line, and lets you choose whether the tool runs INSIDE, ON or OUTSIDE the line of the shape. Its fields are:
- length / width: the dimensions of the rectangle (mm)
- diameter: the diameter of the circle (Ø)
- corner radius: the rounding of the rectangle’s corners, with which you can go all the way to an oval (mm)
- depth: the thickness of material to be cut (mm)
- Z step: the depth of every pass, from which the number of passes is calculated (mm)
- feed: the cutting speed (mm/min)
- plunge: the speed at which the tool descends into the material (mm/min)
- tool diameter: the diameter of the tool to be used (Ø)
- safe Z: the height to which the tool rises for rapid moves (mm)
Pressing MAKE G-CODE the program is generated and loaded, ready to run. It starts from the work X0 Y0 Z0, so you must have zeroed on the workpiece first. For a facing pass, a pocket or a simple cut there is no need to open a drawing program.
The ATC tab
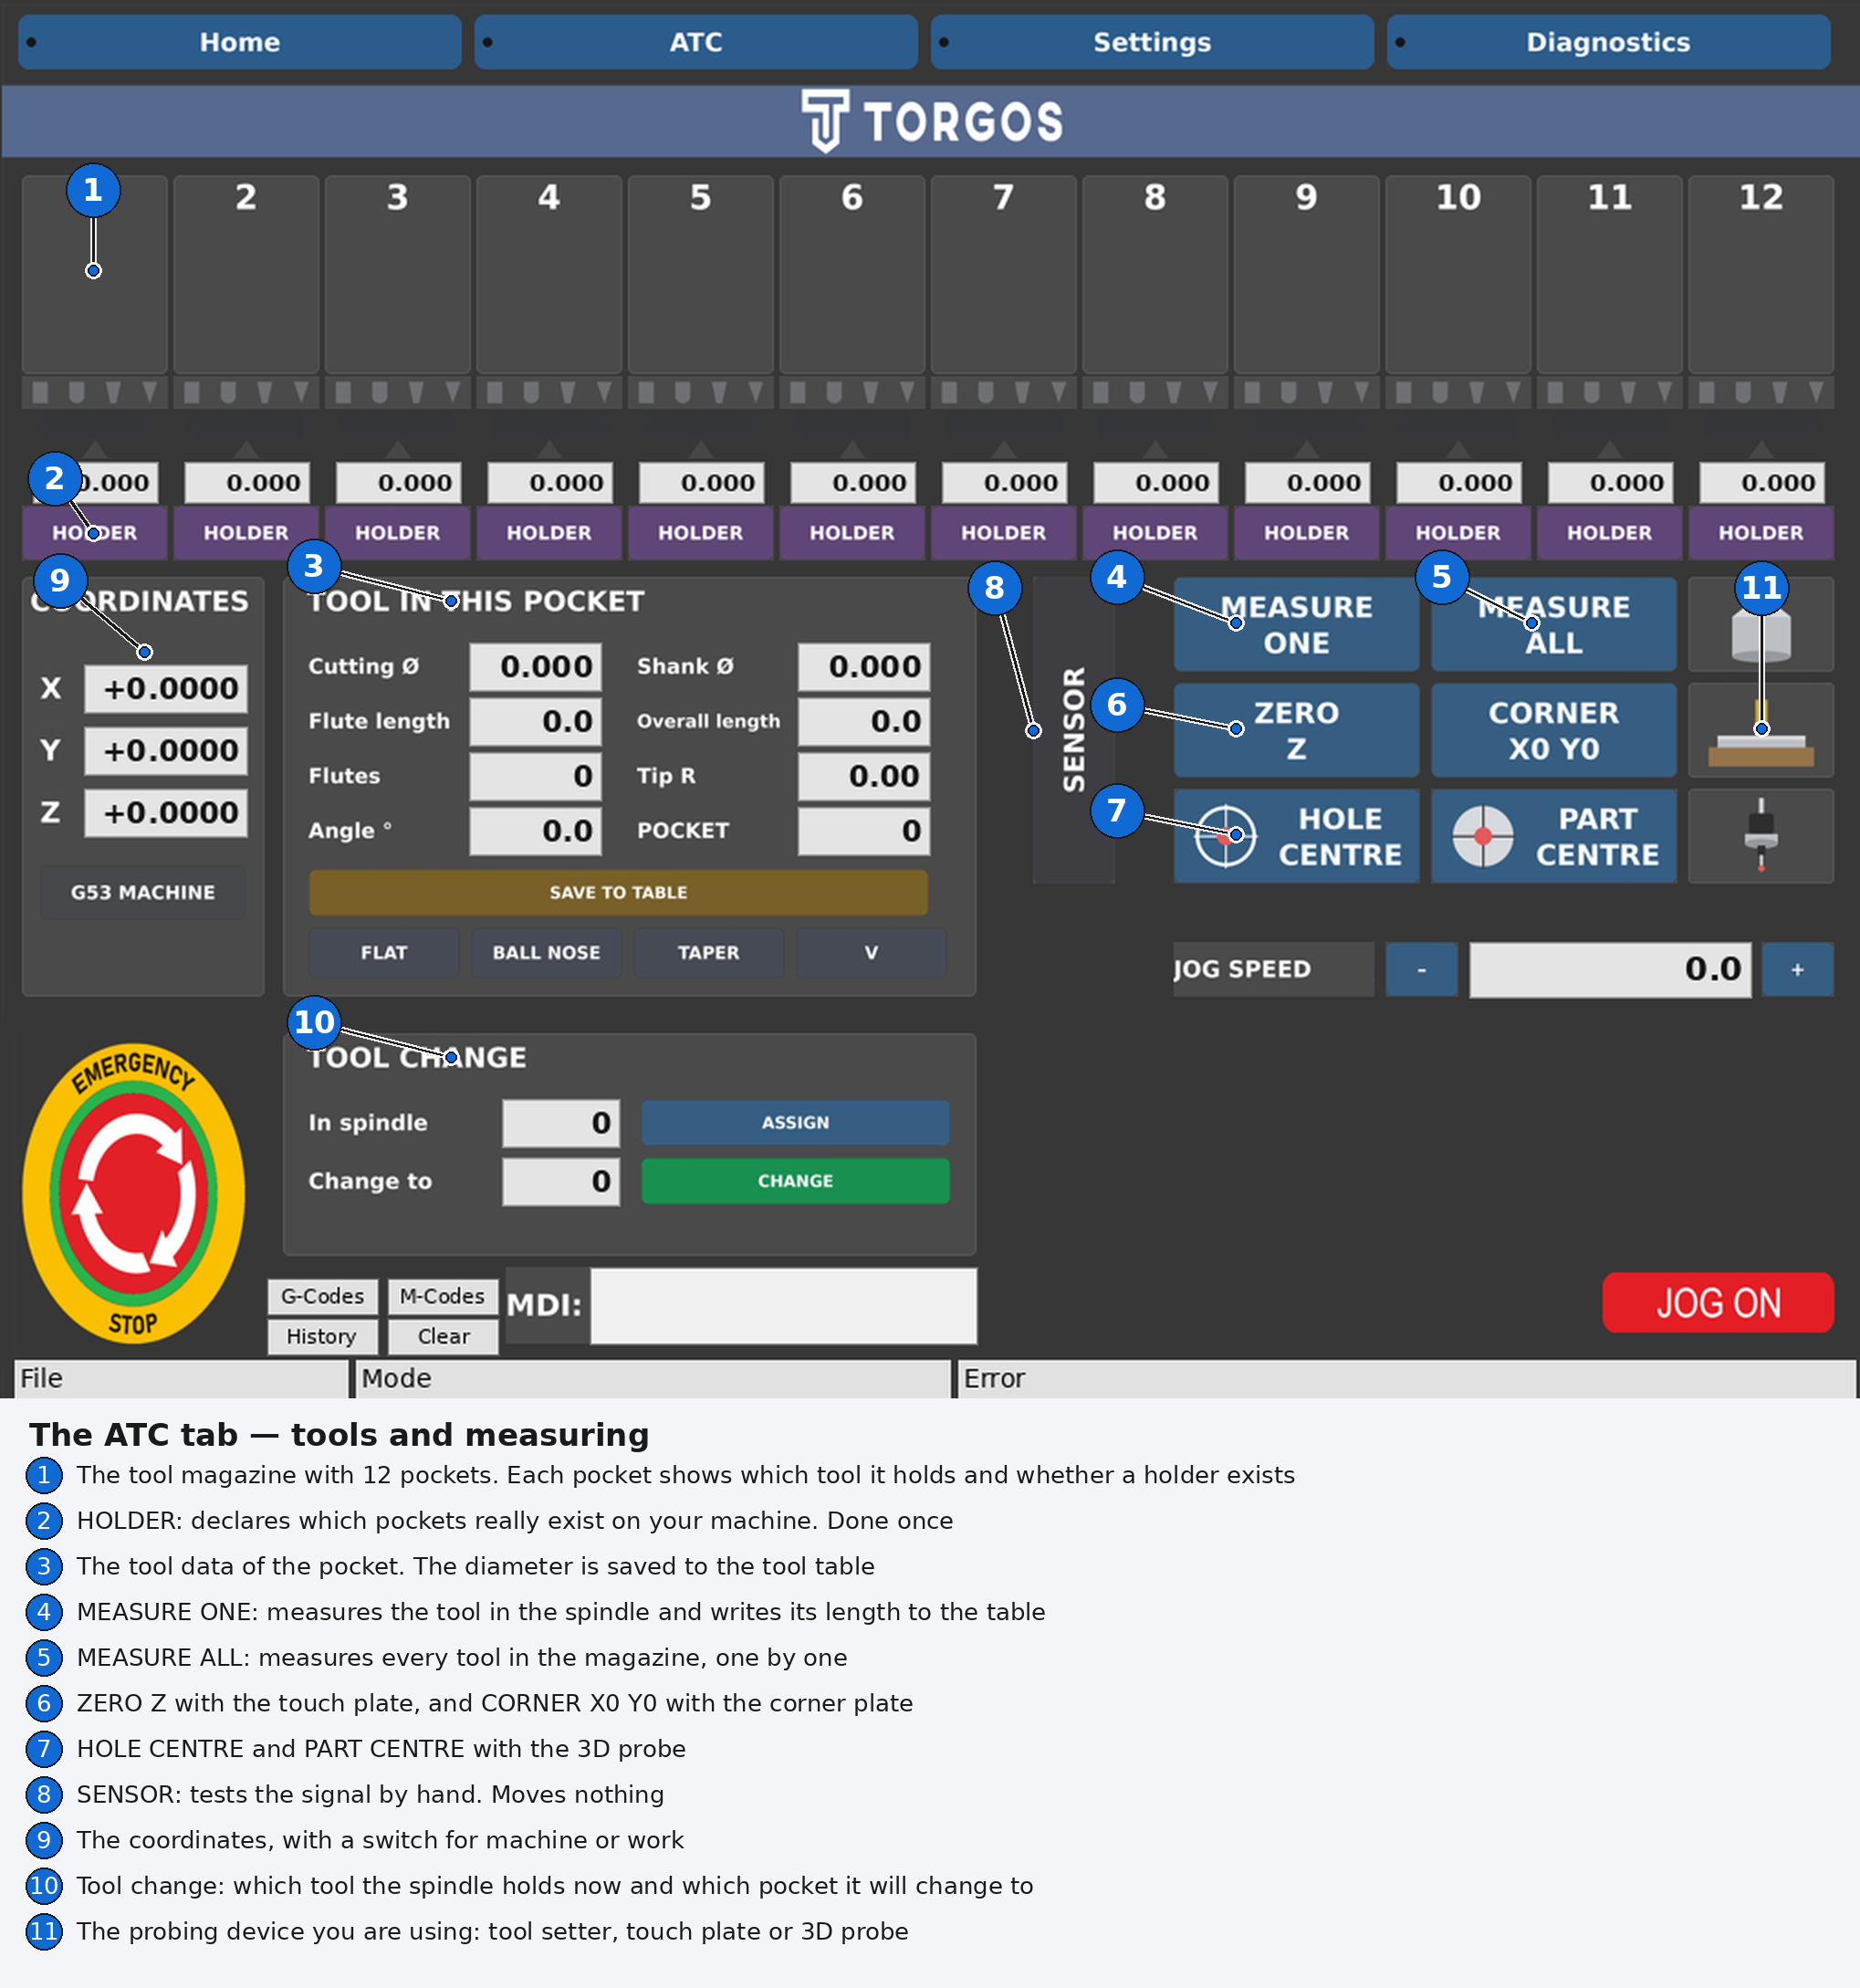
At the top of the tab is the tool rack with 12 pockets. Every pocket has a button named HOLDER, with which you declare which pockets really exist on your machine. It is done once and the setting stays after Mach3 closes. In the manual installation the pockets do not affect operation.
Selecting a pocket, the TOOL OF THE POCKET box shows the data of its tool: cutting and shank diameter, cutting length, overall length, number of flutes, angle, tip radius and type. The diameter is written to the Mach3 tool table and the rest are stored permanently in the profile.
Below the rack are the measurements. In all of them the result is recorded only after it is confirmed that the tool really touched the sensor. Without that check, a cut wire or a touch plate out of position would mean the machine descends the whole travel and sets zero in thin air.
MEASURE ONE: measures the tool in the spindle on the fixed height sensor and records its length in the tool table. It makes two contacts, one fast and one slow for accuracy.
MEASURE ALL: for machines with automatic tool change. It takes the tools of the rack one by one, measures them and returns them to their pocket. If one does not touch the sensor, it returns it and stops, reporting in which pocket the problem appeared.
ZERO Z: zeroes the Z axis on the surface of the material with the touch plate.
CORNER X0 Y0: finds the corner of the workpiece with the corner plate and sets X0, Y0 and Z0.
HOLE CENTRE and PART CENTRE: with the 3D probe they find the centre of a hole or of a part and set it as X0 Y0.
SENSOR: a test that moves nothing. You touch the sensor by hand and the screen shows whether Mach3 received the signal. It is good practice before every working day.
The settings of your own machine
The position of the sensor and of the rack differ on every machine tool, so none of those numbers is written inside the macros. They all live in one text file, C:Mach3TorgosProbe.txt, which opens with Notepad. As long as a number is missing, the corresponding button does not move the machine but stops and reports which one is missing.
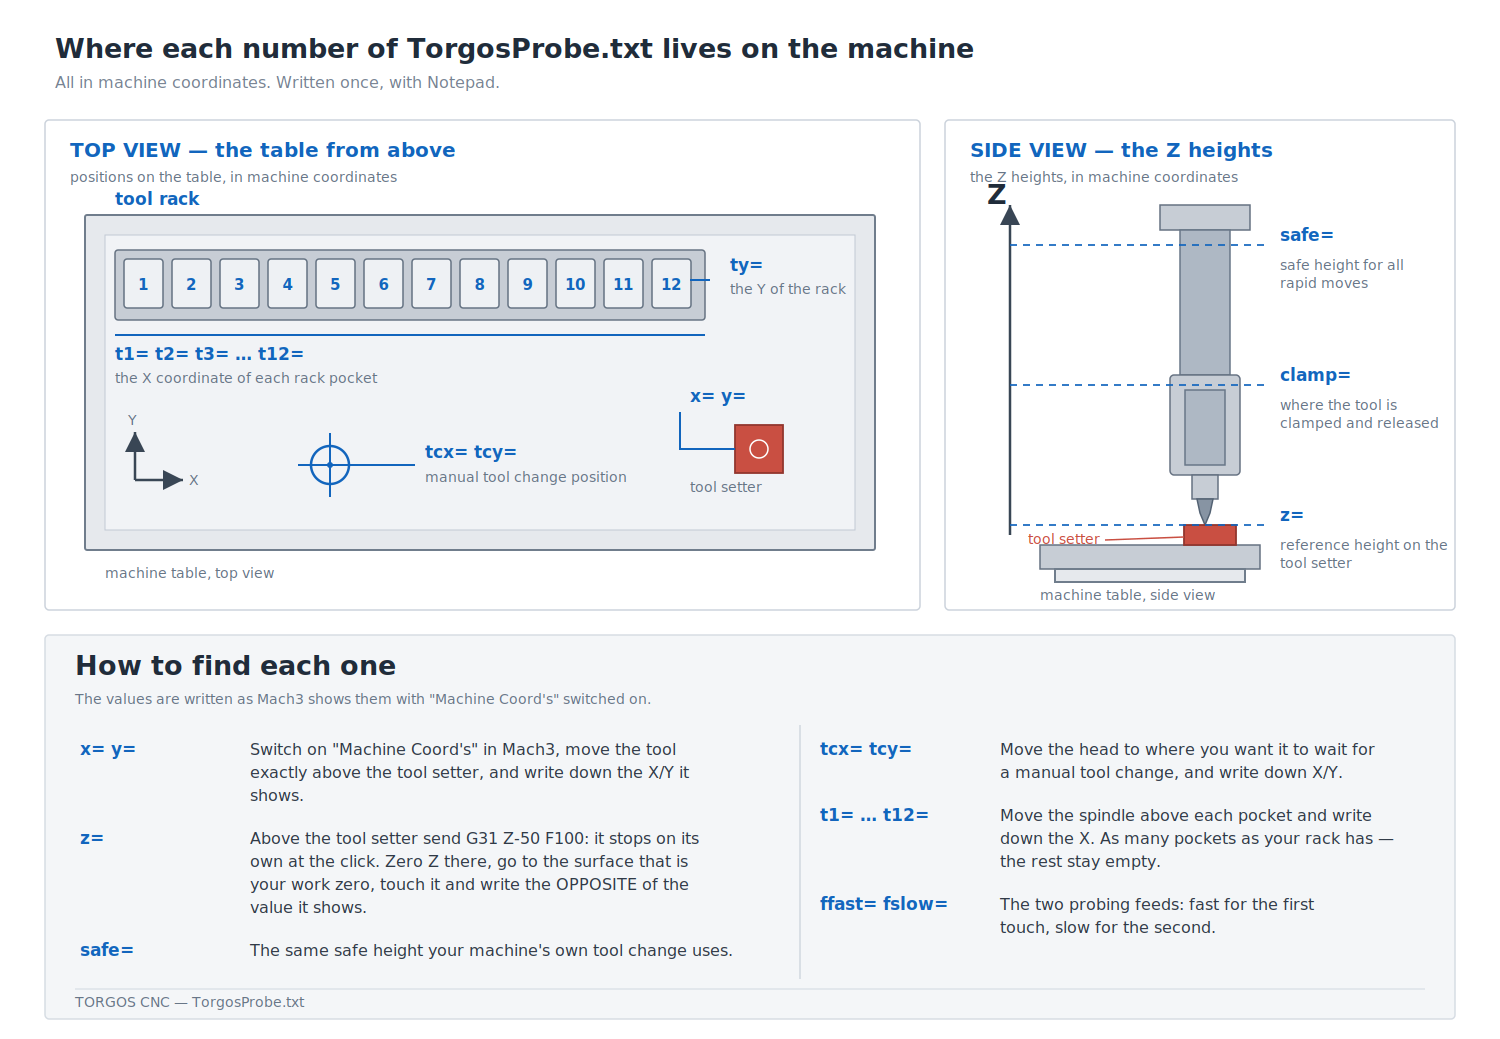
For tool measurement the basics are needed:
- x= and y=: the position of the height sensor in machine coordinates. You find it by switching on “Machine Coord’s” in Mach3 and bringing the tool exactly above the sensor.
- safe=: the safe Z height for rapid moves, in machine coordinates. It is the same one your machine’s tool change uses.
- z=: the reference height. Above the sensor you send G31 Z-50 F100 and the tool stops on its own at the touch. You zero Z there, go to the surface you use as work zero, touch it as you always do and write down the value shown, with the opposite sign.
- ffast= and fslow=: the two probing speeds, fast and slow (mm/min).
If you change tools by hand, you also need:
tcx= and tcy=: the position the head goes to for the change. Without them the machine would stop wherever it is, often above the workpiece.
If you have a rack with automatic tool change, you also need:
- probe=: whether the machine measures the tool at every change.
- t1= to t12=: the X position of every pocket of the rack. You fill in as many as your machine has and the rest stay empty.
- ty=, bridge=, clamp=: the Y position of the rack, the position to which the bridge comes out before the change, and the height at which the tool is clamped.
All of these are filled in once. The installer reads the M6Start of your profile and fills in by itself whatever values it finds there, while whether the machine has a rack it writes from your answer during the installation.
Installation
The installation is done with a single file, TORGOS-screenset-Setup.exe, on the machine tool’s computer that has Mach3 installed.
Note: Mach3 must be closed during the installation.
The program asks four things. After every answer we press Enter. No question has a default: a bare Enter does not move on, it waits for an answer.
- Language: 1 for Greek, 2 for English. The whole package, screen, images and messages, is installed in the language you chose.
- How the machine changes tools: 1 by hand, 2 automatically. If the machine tool has a manual or semi-automatic change, we choose 1. If it has an automatic tool changer, we choose 2. The choice decides how the Probe Z, MEASURE ONE and MEASURE ALL buttons work internally.
- Which profile: you pick the profile you work with today. The program does not touch it. It creates a copy named “[your profile] TORGOS SCREEN”, with all its settings and macros, and installs the screen inside that copy. It is essentially a clone of your own profile, and if yours worked correctly, the clone will work too.
- Whether to install the measurement macros M142 and M143: we answer Y. They are Probe Z and the corner plate, and the program asks separately because these two need the values in TorgosProbe.txt to work. We answer N only if we already have our own M142 and M143 in the profile and want to keep them.
The program writes a log at C:Mach3TORGOS-egkatastasi.txt, with date, version, profile and the files installed, and keeps a dated backup of every file it replaces.
If something stops working
Your original profile always stays untouched. If you open Mach3 with it, the machine works as it did before the installation. The first step in any problem is to run the installer again, which is harmless and solves almost everything. If the problem persists, send us the installation log and the TorgosProbe.txt and we will look into it.
Requirements
- Mach3 on Windows, with a profile that already works.
- A screen of 1024×768 resolution or larger.
- For the measurements, a height sensor, touch plate or 3D probe, connected to the probe input.
Licence
The licence belongs to the business that buys it and covers all of its machines, on as many installations as it needs, with no subscription. You may not pass the package on or resell it to third parties.
Updates are free and have no time limit. You download them from your account on torgoscnc.gr, with the email and password you set when you bought it.
The right of withdrawal for a digital product is covered by the shop’s Terms and Conditions.
If your browser warns you
Chrome or Edge may tell you the file is «not commonly downloaded». It is not a virus: the installer is not digitally signed and few people download it, so the browser judges the file by its reputation, not its contents. Choose «Keep» or «Download anyway» and carry on.
Reviews (0)
Shipping & Delivery


Αποστολή & Παράδοση
Όλες οι παραγγελίες αποστέλλονται με ACS Courier και παραδίδονται σε 1-3 εργάσιμες ημέρες.
Κόστος αποστολής:
- Αποστολή: €5,80
- Αντικαταβολή: €5,50
- Δωρεάν αποστολή για παραγγελίες άνω των €100
Ογκώδη δέματα:
Για ογκώδη ή βαριά δέματα η αποστολή πραγματοποιείται μέσω μεταφορικής εταιρείας με χρέωση στον παραλήπτη.
Αποστολές εκτός Ελλάδας:
Πραγματοποιούνται κατόπιν συνεννόησης. Επικοινωνήστε μαζί μας για περισσότερες πληροφορίες.



Reviews
There are no reviews yet.